okhttp源码分析
okhttp源码分析笔记
下面将通过同步和异步的基本使用方式、Dispatcher作用、主要的拦截器功能、缓存策略以及连接池,一步步分析底层实现流程。
基本使用大致分析
OkHttpClient有两种请求的方式,一是同步请求,二是异步请求。下面先简单看下两种请求的不同使用方法,然后简略看看请求内部运作流程,得出一个大致了解后,有个整体印象,抓住关键点。
同步请求
同步请求示例:
1
2
3
4
5
6
7
8
9
10
11
12
13
14
15
16
//第一步:实例化OkHttpClient对象
OkHttpClient client = new OkHttpClient();
		//第二步:创建一个requset对象
        Request request = new Request
                .Builder()
                .url("http://www.zhouhaoh.com")
                .build();
        try {
            //第三步:用OkHttpClient执行同步请求
            Response response = client.newCall(request).execute();
            if (response.isSuccessful()) {
                System.out.println("requset success");
            }
        } catch (IOException e) {
            e.printStackTrace();
        }
实例化OkHttpClient
在第一步实例化一个
OkHttpClient对象的时候,okhttp利用构建者模式在内部已经做了很多初始化的准备了,跟着代码往下,OkHttpClient利用内部类builder初始化了很多配置,比如分发器Dispatcher,ConnectionPool连接池等等,这样我们才能在new OkHttpClient()的时候, 已经是一个可用的客户端了。1 2 3 4 5 6 7 8 9 10 11 12 13 14 15 16 17 18 19
public static final class Builder { Dispatcher dispatcher; @Nullable Proxy proxy; List<Protocol> protocols; ... public Builder() { dispatcher = new Dispatcher(); protocols = DEFAULT_PROTOCOLS; connectionSpecs = DEFAULT_CONNECTION_SPECS; eventListenerFactory = EventListener.factory(EventListener.NONE); ... connectionPool = new ConnectionPool(); dns = Dns.SYSTEM; followSslRedirects = true; followRedirects = true; retryOnConnectionFailure = true; connectTimeout = 10_000; ... }
创建Request对象。
创建一个
requset对象,这个是OkHttpClient封装的请求对象,所有的与请求有关的配置都通过Requset的内部类Builder构建,能设置请求的url,请求头,请求体,请求方式等等。1 2 3 4 5 6
public static class Builder { HttpUrl url; String method; Headers.Builder headers; RequestBody body; Object tag;
创建RealCall对象。
同步最后的是
client.newCall(request).execute()进行同步请求,实例化好的Requset对象,不管同步和异步,都是调用了OkhttpClient的一个newCall对象,跟代码发现:newCall方法最终实例化出了一个RealCall对象,并持有OkHttpClient对象,在构造方法中也是做一个监听器,拦截器成员变量的赋值。最终发现,发起请求的是这个RealCall对象。1 2 3 4 5 6 7 8 9 10 11 12
//RealCall.java RealCall(OkHttpClient client, Request originalRequest, boolean forWebSocket) { final EventListener.Factory eventListenerFactory = client.eventListenerFactory(); this.client = client; this.originalRequest = originalRequest; this.forWebSocket = forWebSocket; this.retryAndFollowUpInterceptor = new RetryAndFollowUpInterceptor(client, forWebSocket); // TODO(jwilson): this is unsafe publication and not threadsafe. this.eventListener = eventListenerFactory.create(this); }
发起同步请求
最终
RealCall.execute(),才是请求的执行者,下面是execute方法,有一个synchronized代码,加一个标志位exexuted,这个是为了判断时候执行过本次请求,假如已经被执行,如果再次调用执行就抛出异常。1 2 3 4 5 6 7 8 9 10 11 12 13 14 15 16 17
//RealCall.java @Override public Response execute() throws IOException { synchronized (this) { if (executed) throw new IllegalStateException("Already Executed"); executed = true; } captureCallStackTrace(); try { / client.dispatcher().executed(this); Response result = getResponseWithInterceptorChain(); if (result == null) throw new IOException("Canceled"); return result; } finally { client.dispatcher().finished(this); } }
继续后面代码发现,将本次请求加入了
dispatcher分发器的同步队列(后面详细分析),然后,调用了一个叫做getResponseWithInterceptorChain()的方法,就返回了一个Response对象,最终发回给调用者了,那很明显,所有的请求关键就在这个getResponseWithInterceptorChain方法了。1 2 3 4 5 6 7 8 9 10 11 12 13 14 15 16 17
Response getResponseWithInterceptorChain() throws IOException { // Build a full stack of interceptors. List<Interceptor> interceptors = new ArrayList<>(); interceptors.addAll(client.interceptors()); interceptors.add(retryAndFollowUpInterceptor); interceptors.add(new BridgeInterceptor(client.cookieJar())); interceptors.add(new CacheInterceptor(client.internalCache())); interceptors.add(new ConnectInterceptor(client)); if (!forWebSocket) { interceptors.addAll(client.networkInterceptors()); } interceptors.add(new CallServerInterceptor(forWebSocket)); Interceptor.Chain chain = new RealInterceptorChain( interceptors, null, null, null, 0, originalRequest); return chain.proceed(originalRequest); }
此方法就是
OkHttpClient的拦截器链,先看整体,后面分析。
异步请求
异步请求示例:
1
2
3
4
5
6
7
8
9
10
11
12
13
14
15
16
17
 OkHttpClient client = new OkHttpClient();
        Request request = new Request
                .Builder()
                .url("http://www.zhouhaoh.com")
                .build();
        client.newCall(request).enqueue(new Callback() {
            @Override
            public void onFailure(Call call, IOException e) {
                System.out.println("requset fail");
            }
            @Override
            public void onResponse(Call call, Response response) throws IOException {
                if (response.isSuccessful()) {
                    System.out.println("requset success");
                }
            }
        });
异步请求结果回调是在子线程,如需要进行UI更新的操作,需要切换线程。
看完同步请求的用法,再看异步请求,发现同样的套路,实例化OkHttpClient对象,创建Requset,newCall…,只不过最后调用的enqueue()方法。传入一个回调函数。见代码:
1
2
3
4
5
6
7
8
9
  @Override
  public void enqueue(Callback responseCallback) {
    synchronized (this) {
      if (executed) throw new IllegalStateException("Already Executed");
      executed = true;
    }
    captureCallStackTrace();
    client.dispatcher().enqueue(new AsyncCall(responseCallback));
  }
同样,一个同步代码块,判断后,captureCallStackTrace捕获异常,最终,调用dispatcher,加进异步请求对内。但是不同的是创建了一个AsyncCall对象。
1
2
3
4
5
6
7
8
9
//Dispatcher.java
synchronized void enqueue(AsyncCall call) {
    if (runningAsyncCalls.size() < maxRequests && runningCallsForHost(call) < maxRequestsPerHost) {
      runningAsyncCalls.add(call);
      executorService().execute(call);
    } else {
      readyAsyncCalls.add(call);
    }
  }
这个方法先从一个判断的区别就是进入if会多一个 executorService(),那就先看看这个方法调用吧。
1
2
3
4
5
6
7
  public synchronized ExecutorService executorService() {
    if (executorService == null) {
      executorService = new ThreadPoolExecutor(0, Integer.MAX_VALUE, 60, TimeUnit.SECONDS,
          new SynchronousQueue<Runnable>(), Util.threadFactory("OkHttp Dispatcher", false));
    }
    return executorService;
  }
原来是创建了一个线程池,这是一个网络请求任务线程池,看看创建线程池的参数可以发现,在Okhttp中,构建了一个阀值为[0, Integer.MAX_VALUE]的线程池,它不保留任何最小线程数,随时创建更多的线程数,当线程空闲时只能活60秒,在实际运行中,当收到10个并发请求时,线程池会创建十个线程,当工作完成后,线程池会在60秒后相继关闭所有线程。这一切就保证异步请求的高效执行。
返回看看之前enqueue方法中的if判断满足以下条件:
- 当前请求数小于最大请求数maxRequests 64
- 对单一host的请求小于阈值maxRequestsPerHost 5
就会把此次请求加入异步队列,放入线程池,进行请求。反之,加入等待队列。
因为上面在分发器中executorService().execute(call);执行。
1
2
3
4
5
6
7
8
9
10
//ReallCall.java
final class AsyncCall extends NamedRunnable {
    private final Callback responseCallback;

    AsyncCall(Callback responseCallback) {
      super("OkHttp %s", redactedUrl());
      this.responseCallback = responseCallback;
    }
    ...
  }
再看看AsyncCall这个类,发现是Reallcall的一个内部类,继承自NamedRunnable,继续往下看:
1
2
3
4
5
6
7
8
9
10
11
12
13
14
15
16
17
18
19
public abstract class NamedRunnable implements Runnable {
  protected final String name;

  public NamedRunnable(String format, Object... args) {
    this.name = Util.format(format, args);
  }

  @Override public final void run() {
    String oldName = Thread.currentThread().getName();
    Thread.currentThread().setName(name);
    try {
      execute();
    } finally {
      Thread.currentThread().setName(oldName);
    }
  }

  protected abstract void execute();
}
NamedRunnable原来实现了Runnable!!!,在run方法中,调用了抽象方法execute(),所以,当AsyncCall加入线程池的时候,真正执行的是NamedRunnable的子类AsyncCall中实现的execute方法,方法如下:
1
2
3
4
5
6
7
8
9
10
11
12
13
14
15
16
17
18
19
20
21
22
23
24
//AsyncCall中实现的execute方法。
@Override
protected void execute() {
      boolean signalledCallback = false;
      try {
        Response response = getResponseWithInterceptorChain();
        if (retryAndFollowUpInterceptor.isCanceled()) {
          signalledCallback = true;
          responseCallback.onFailure(RealCall.this, new IOException("Canceled"));
        } else {
          signalledCallback = true;
          responseCallback.onResponse(RealCall.this, response);
        }
      } catch (IOException e) {
        if (signalledCallback) {
          // Do not signal the callback twice!
          Platform.get().log(INFO, "Callback failure for " + toLoggableString(), e);
        } else {
          responseCallback.onFailure(RealCall.this, e);
        }
      } finally {
        client.dispatcher().finished(this);
      }
    }
终于发现,又是一系列判断,最后通过ReallCall中的getResponseWithInterceptorChain()获取请求结果!!!然后进行了成功和失败的回调。最终一次异步请求整体执行完成。
同步和异步整体调用总结
通过以上同步请求和异步请求的整体分析,总体流程大概清楚了。如下图:

可以得出,都是通过dispatcher加入各自的队列,然后最终的请求执行关键就是在ReallCall中的getResponseWithInterceptorChain方法 ,不同点异步调用会有一个线程池来调用,所以这也是通过异步调用的网络请求,为什么回调是在子线程的原因。下面看看关键Dispatcher类和getResponseWithInterceptorChain方法了。
任务分发器 Dispatcher
dispatcher内部维护着三个队列以及一个线程池。
1
2
3
4
5
6
7
8
9
 //Dispatcher.java
 /** Ready async calls in the order they'll be run. */
  private final Deque<AsyncCall> readyAsyncCalls = new ArrayDeque<>();

  /** Running asynchronous calls. Includes canceled calls that haven't finished yet. */
  private final Deque<AsyncCall> runningAsyncCalls = new ArrayDeque<>();

  /** Running synchronous calls. Includes canceled calls that haven't finished yet. */
  private final Deque<RealCall> runningSyncCalls = new ArrayDeque<>();
readyAsyncCalls:待执行异步任务队列runningAsyncCalls:运行中异步任务队列runningSyncCalls:运行中同步任务队列
线程池在上面已经初步分析过,再看看在ReallCall中异步和同步请求的执行:
同步:
1
2
3
4
5
6
7
8
9
10
11
12
13
14
15
  @Override public Response execute() throws IOException {
    synchronized (this) {
      if (executed) throw new IllegalStateException("Already Executed");
      executed = true;
    }
    captureCallStackTrace();
    try {
      client.dispatcher().executed(this);
      Response result = getResponseWithInterceptorChain();
      if (result == null) throw new IOException("Canceled");
      return result;
    } finally {
      client.dispatcher().finished(this);
    }
  }
异步:
1
2
3
4
5
6
7
8
9
10
11
12
13
14
15
16
17
18
19
20
21
22
@Override protected void execute() {
      boolean signalledCallback = false;
      try {
        Response response = getResponseWithInterceptorChain();
        if (retryAndFollowUpInterceptor.isCanceled()) {
          signalledCallback = true;
          responseCallback.onFailure(RealCall.this, new IOException("Canceled"));
        } else {
          signalledCallback = true;
          responseCallback.onResponse(RealCall.this, response);
        }
      } catch (IOException e) {
        if (signalledCallback) {
          // Do not signal the callback twice!
          Platform.get().log(INFO, "Callback failure for " + toLoggableString(), e);
        } else {
          responseCallback.onFailure(RealCall.this, e);
        }
      } finally {
        client.dispatcher().finished(this);
      }
    }
发现最终都会调用dispatcher的finished方法。
1
2
3
4
5
6
7
8
9
10
11
12
13
14
 private <T> void finished(Deque<T> calls, T call, boolean promoteCalls) {
    int runningCallsCount;
    Runnable idleCallback;
    synchronized (this) {
      if (!calls.remove(call)) throw new AssertionError("Call wasn't in-flight!");
      if (promoteCalls) promoteCalls();
      runningCallsCount = runningCallsCount();
      idleCallback = this.idleCallback;
    }

    if (runningCallsCount == 0 && idleCallback != null) {
      idleCallback.run();
    }
  }
发现在请求执行结束后,不管成功与否,都会调用dispatcher.finished方法,通知分发器相关任务已结束。当时异步调用的时候,会进行 promoteCalls()判断。
1
2
3
4
5
6
7
8
9
10
11
12
13
14
15
16
  private void promoteCalls() {
    if (runningAsyncCalls.size() >= maxRequests) return; // Already running max capacity.
    if (readyAsyncCalls.isEmpty()) return; // No ready calls to promote.

    for (Iterator<AsyncCall> i = readyAsyncCalls.iterator(); i.hasNext(); ) {
      AsyncCall call = i.next();

      if (runningCallsForHost(call) < maxRequestsPerHost) {
        i.remove();
        runningAsyncCalls.add(call);
        executorService().execute(call);
      }

      if (runningAsyncCalls.size() >= maxRequests) return; // Reached max capacity.
    }
  }
源码中注释写得已经明了,判断当前正在执行的异步任务数小于最大任务64和等待队列不为空的情况下,将等待中的队列任务拿出来依次加入执行队列,并加入执行线程池,直到满足之前的执行队列最大数小于64,和单一host的请求小于阈值5这两个条件。
返回finished这个方法,在判断完promoteCalls()后,会检查正在runningCallsCount,从代码可以看出,只是计算了正在执行的同步和异步队列的总和。
1
2
3
 public synchronized int runningCallsCount() {
    return runningAsyncCalls.size() + runningSyncCalls.size();
  }
这样就能知道整个线程池是不是处于空闲的状态,假如是空闲的状态,即没有当前任务和等待的任务,就会调动idleCallback,执行空闲通知回调线程。至于这个空闲回调的实现,是okhttpclient给我们自己预留的,当然,在okhttpclient初始化的时候,builder有个参数设置(见以下下代码),只是我们一般用不到自定义dispatcher的参数而已。
1
2
3
4
5
6
//okhttpClient.java
public Builder dispatcher(Dispatcher dispatcher) {
      if (dispatcher == null) throw new IllegalArgumentException("dispatcher == null");
      this.dispatcher = dispatcher;
      return this;
    }
着这个地方就能自定义dispatcher了,所以我们没有在初始化OkhttpClient的时候,传入dispatcher,是不会有这个回调的,自定义例如:
1
2
3
4
5
6
7
8
9
10
11
12
13
Dispatcher dispatcher = new Dispatcher();
dispatcher.setMaxRequests(666);
//设置空闲时回调。
dispatcher.setIdleCallback(new Runnable() {
    @Override
    public void run() {
        //todo 执行我们自己的空闲回调逻辑
    }
});
 OkHttpClient client = new OkHttpClient
          .Builder()
          .dispatcher(dispatcher)
          .build();
至此,dispatcher的分析大概完成了,总结就是内部维护了三个队列(一个异步执行队列,一个异步等待队列,一个同步执行队列),和一个线程池。实现了高并发,低阻塞的运行,同时配合finished这个方法,实现了良好的任务调度。
链式拦截器
通过dispatcher的调度后,最终都会通过interceptor,进行请求的拦截器处理。
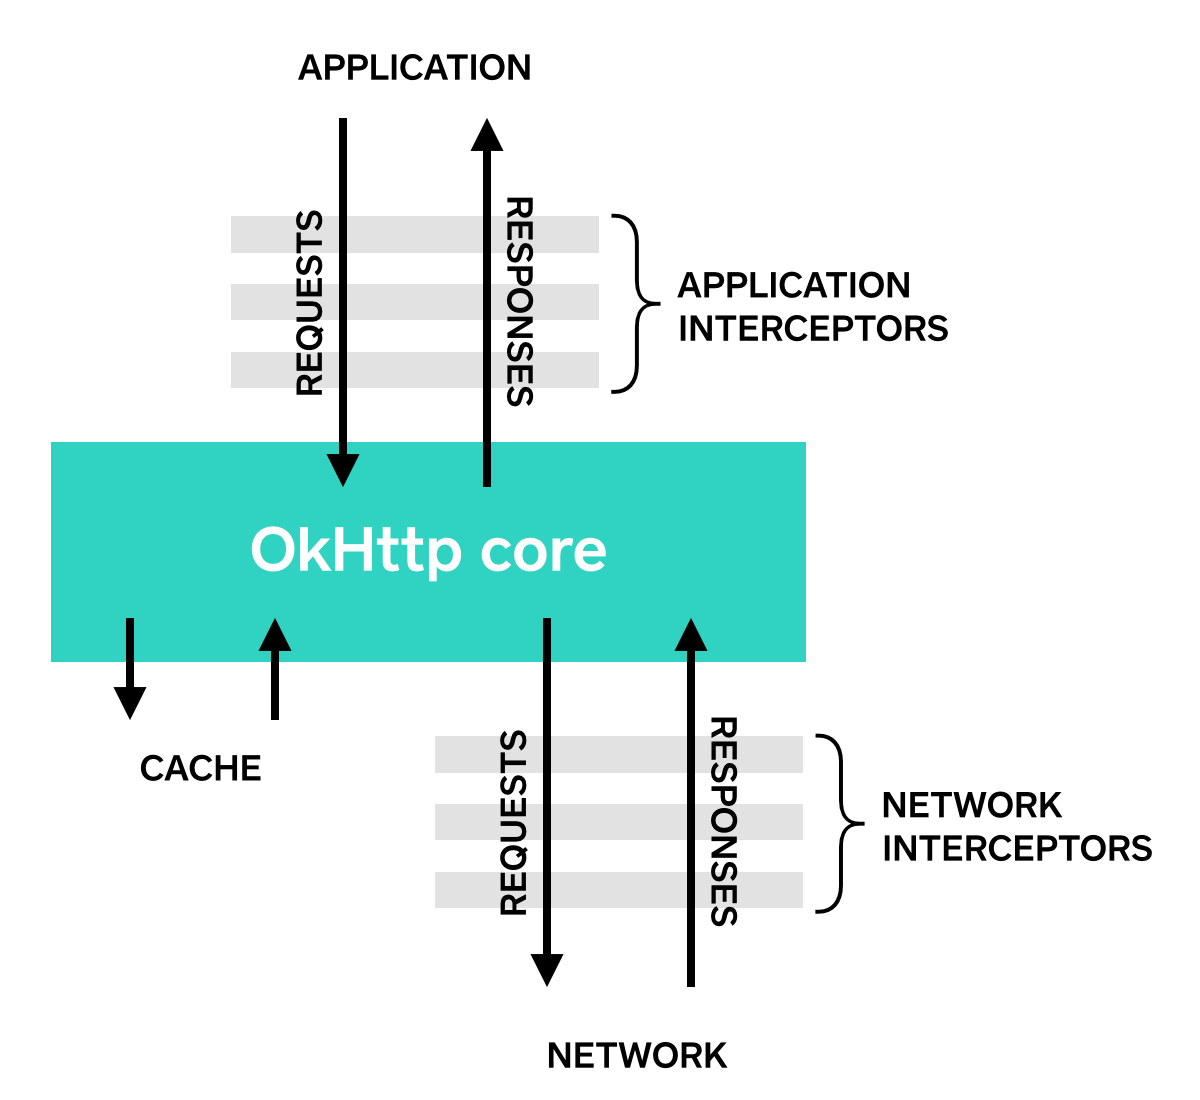
图为官网okhttp core交互图。
不管是同步任务还是异步任务,最终都会进入getResponseWithInterceptorChain(),通过这个方法中获取网络交互的结果。
1
2
3
4
5
6
7
8
9
10
11
12
13
14
15
16
17
18
19
//RealCall.java
Response getResponseWithInterceptorChain() throws IOException {
    // Build a full stack of interceptors.
    List<Interceptor> interceptors = new ArrayList<>();
    interceptors.addAll(client.interceptors());
    interceptors.add(retryAndFollowUpInterceptor);
    interceptors.add(new BridgeInterceptor(client.cookieJar()));
    interceptors.add(new CacheInterceptor(client.internalCache()));
    interceptors.add(new ConnectInterceptor(client));
    if (!forWebSocket) {
      interceptors.addAll(client.networkInterceptors());
    }
    interceptors.add(new CallServerInterceptor(forWebSocket));

    Interceptor.Chain chain = new RealInterceptorChain(
        interceptors, null, null, null, 0, originalRequest);
    //
    return chain.proceed(originalRequest);
  }
core分为有五个拦截器,外加用户自定义的拦截器,汇总成一个拦截器集合,最终都会通过一系列的链式调用,返回Response给最终的Response。详细来说就是用过当前interceptor,指向下一个。返回结果。见代码RealInterceptorChain类的关键代码processed方法:
1
2
3
4
5
6
7
8
9
10
11
12
13
14
15
16
17
18
19
20
21
22
23
24
25
26
27
28
29
30
public Response proceed(Request request, StreamAllocation streamAllocation, HttpCodec httpCodec,
      RealConnection connection) throws IOException {
    if (index >= interceptors.size()) throw new AssertionError();
    calls++;
    // If we already have a stream, confirm that the incoming request will use it.
    if (this.httpCodec != null && !this.connection.supportsUrl(request.url())) {
      throw new IllegalStateException("network interceptor " + interceptors.get(index - 1)
          + " must retain the same host and port");
    }
    // If we already have a stream, confirm that this is the only call to chain.proceed().
    if (this.httpCodec != null && calls > 1) {
      throw new IllegalStateException("network interceptor " + interceptors.get(index - 1)
          + " must call proceed() exactly once");
    }
    // 调用下一个拦截器的方法。注意index+1
    RealInterceptorChain next = new RealInterceptorChain(
        interceptors, streamAllocation, httpCodec, connection, index + 1, request);
    Interceptor interceptor = interceptors.get(index);
    Response response = interceptor.intercept(next);
    // Confirm that the next interceptor made its required call to chain.proceed().
    if (httpCodec != null && index + 1 < interceptors.size() && next.calls != 1) {
      throw new IllegalStateException("network interceptor " + interceptor
          + " must call proceed() exactly once");
    }
    // Confirm that the intercepted response isn't null.
    if (response == null) {
      throw new NullPointerException("interceptor " + interceptor + " returned null");
    }
    return response;
  }
从上面代码可以看出,除去if判断的代码之后,关键就在注释的地方,调用的是下一个拦截器。最终得到Response结果。整体流程如下图:
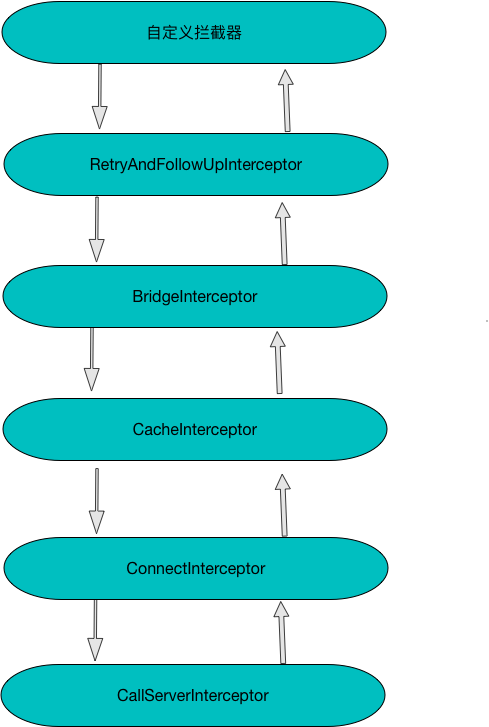
下面分来来看看这五个拦截器。
RetryAndFollowUpInterceptor
RetryAndFollowUpInterceptor是okhttp内部维护的第一个拦截器,关键代码在intercept方法中:
1
2
3
4
5
6
7
8
9
10
11
12
13
14
15
16
17
18
19
20
21
22
23
24
25
26
27
28
29
30
31
32
33
34
35
36
37
38
39
40
41
42
43
44
45
46
47
48
49
50
51
52
53
54
55
56
57
58
59
60
61
62
63
64
65
66
67
68
69
70
71
72
73
74
75
//RetryAndFollowUpInterceptor
@Override
public Response intercept(Chain chain) throws IOException {
    Request request = chain.request();
    streamAllocation = new StreamAllocation(
        client.connectionPool(), createAddress(request.url()), callStackTrace);
    int followUpCount = 0;
    Response priorResponse = null;
    while (true) {
      if (canceled) {
        streamAllocation.release();
        throw new IOException("Canceled");
      }
      Response response = null;
      boolean releaseConnection = true;
      try {
        response = ((RealInterceptorChain) chain).proceed(request, streamAllocation, null, null);
        releaseConnection = false;
      } catch (RouteException e) {
        // The attempt to connect via a route failed. The request will not have been sent.
        if (!recover(e.getLastConnectException(), false, request)) {
          throw e.getLastConnectException();
        }
        releaseConnection = false;
        continue;
      } catch (IOException e) {
        // An attempt to communicate with a server failed. The request may have been sent.
        boolean requestSendStarted = !(e instanceof ConnectionShutdownException);
        if (!recover(e, requestSendStarted, request)) throw e;
        releaseConnection = false;
        continue;
      } finally {
        // We're throwing an unchecked exception. Release any resources.
        if (releaseConnection) {
          streamAllocation.streamFailed(null);
          streamAllocation.release();
        }
      }
      // Attach the prior response if it exists. Such responses never have a body.
      if (priorResponse != null) {
        response = response.newBuilder()
            .priorResponse(priorResponse.newBuilder()
                    .body(null)
                    .build())
            .build();
      }
      Request followUp = followUpRequest(response);

      if (followUp == null) {
        if (!forWebSocket) {
          streamAllocation.release();
        }
        return response;
      }
      closeQuietly(response.body());
      if (++followUpCount > MAX_FOLLOW_UPS) {
        streamAllocation.release();
        throw new ProtocolException("Too many follow-up requests: " + followUpCount);
      }
      if (followUp.body() instanceof UnrepeatableRequestBody) {
        streamAllocation.release();
        throw new HttpRetryException("Cannot retry streamed HTTP body", response.code());
      }
      if (!sameConnection(response, followUp.url())) {
        streamAllocation.release();
        streamAllocation = new StreamAllocation(
            client.connectionPool(), createAddress(followUp.url()), callStackTrace);
      } else if (streamAllocation.codec() != null) {
        throw new IllegalStateException("Closing the body of " + response
            + " didn't close its backing stream. Bad interceptor?");
      }
      request = followUp;
      priorResponse = response;
    }
  }
根据上面的代码,发现,创建了一个StreamAllocation对象,这个对象最要负责创建连接 。维护内部维护了一个连接池,用于判断网络请求失败后的重试,以及在可用的情况下复用当前的连接。
BridgeInterceptor
1
2
3
4
5
6
7
8
9
10
11
12
13
14
15
16
17
18
19
20
21
22
23
24
25
26
27
28
29
30
31
32
33
34
35
36
37
38
39
40
41
42
43
44
45
46
47
48
49
50
51
52
53
54
55
56
57
58
59
60
61
62
63
64
65
66
67
  @Override public Response intercept(Chain chain) throws IOException {
    Request userRequest = chain.request();
    Request.Builder requestBuilder = userRequest.newBuilder();

    RequestBody body = userRequest.body();
    if (body != null) {
      MediaType contentType = body.contentType();
      if (contentType != null) {
        requestBuilder.header("Content-Type", contentType.toString());
      }

      long contentLength = body.contentLength();
      if (contentLength != -1) {
        requestBuilder.header("Content-Length", Long.toString(contentLength));
        requestBuilder.removeHeader("Transfer-Encoding");
      } else {
        requestBuilder.header("Transfer-Encoding", "chunked");
        requestBuilder.removeHeader("Content-Length");
      }
    }

    if (userRequest.header("Host") == null) {
      requestBuilder.header("Host", hostHeader(userRequest.url(), false));
    }

    if (userRequest.header("Connection") == null) {
      requestBuilder.header("Connection", "Keep-Alive");
    }

    // If we add an "Accept-Encoding: gzip" header field we're responsible for also decompressing
    // the transfer stream.
    boolean transparentGzip = false;
    if (userRequest.header("Accept-Encoding") == null && userRequest.header("Range") == null) {
      transparentGzip = true;
      requestBuilder.header("Accept-Encoding", "gzip");
    }

    List<Cookie> cookies = cookieJar.loadForRequest(userRequest.url());
    if (!cookies.isEmpty()) {
      requestBuilder.header("Cookie", cookieHeader(cookies));
    }

    if (userRequest.header("User-Agent") == null) {
      requestBuilder.header("User-Agent", Version.userAgent());
    }

    Response networkResponse = chain.proceed(requestBuilder.build());

    HttpHeaders.receiveHeaders(cookieJar, userRequest.url(), networkResponse.headers());

    Response.Builder responseBuilder = networkResponse.newBuilder()
        .request(userRequest);

    if (transparentGzip
        && "gzip".equalsIgnoreCase(networkResponse.header("Content-Encoding"))
        && HttpHeaders.hasBody(networkResponse)) {
      GzipSource responseBody = new GzipSource(networkResponse.body().source());
      Headers strippedHeaders = networkResponse.headers().newBuilder()
          .removeAll("Content-Encoding")
          .removeAll("Content-Length")
          .build();
      responseBuilder.headers(strippedHeaders);
      responseBuilder.body(new RealResponseBody(strippedHeaders, Okio.buffer(responseBody)));
    }

    return responseBuilder.build();
  }
根据以上代码,发现 这个拦截器,主要负责对Requset进行一些请求头的添加,比如Content-Type,User-Agent,Keep-Alive等,Keep-Alive是保持连接,这个也是复用连接必须的,同时,还有一些cookie,编码内容等作用。
CacheInterceptor
1
2
3
4
5
6
7
8
9
10
11
12
13
14
15
16
17
18
19
20
21
22
23
24
25
26
27
28
29
30
31
32
33
34
35
36
37
38
39
40
41
42
43
44
45
46
47
48
49
50
51
52
53
54
55
56
57
58
59
60
61
62
63
64
65
66
67
68
69
70
71
72
73
74
75
76
77
78
79
80
81
82
83
84
85
86
87
88
89
90
91
92
93
94
 @Override public Response intercept(Chain chain) throws IOException {
    Response cacheCandidate = cache != null
        ? cache.get(chain.request())
        : null;

    long now = System.currentTimeMillis();

    CacheStrategy strategy = new CacheStrategy.Factory(now, chain.request(), cacheCandidate).get();
    Request networkRequest = strategy.networkRequest;
    Response cacheResponse = strategy.cacheResponse;

    if (cache != null) {
      cache.trackResponse(strategy);
    }

    if (cacheCandidate != null && cacheResponse == null) {
      closeQuietly(cacheCandidate.body()); // The cache candidate wasn't applicable. Close it.
    }

    // If we're forbidden from using the network and the cache is insufficient, fail.
    if (networkRequest == null && cacheResponse == null) {
      return new Response.Builder()
          .request(chain.request())
          .protocol(Protocol.HTTP_1_1)
          .code(504)
          .message("Unsatisfiable Request (only-if-cached)")
          .body(Util.EMPTY_RESPONSE)
          .sentRequestAtMillis(-1L)
          .receivedResponseAtMillis(System.currentTimeMillis())
          .build();
    }

    // If we don't need the network, we're done.
    if (networkRequest == null) {
      return cacheResponse.newBuilder()
          .cacheResponse(stripBody(cacheResponse))
          .build();
    }

    Response networkResponse = null;
    try {
      networkResponse = chain.proceed(networkRequest);
    } finally {
      // If we're crashing on I/O or otherwise, don't leak the cache body.
      if (networkResponse == null && cacheCandidate != null) {
        closeQuietly(cacheCandidate.body());
      }
    }

    // If we have a cache response too, then we're doing a conditional get.
    if (cacheResponse != null) {
      if (networkResponse.code() == HTTP_NOT_MODIFIED) {
        Response response = cacheResponse.newBuilder()
            .headers(combine(cacheResponse.headers(), networkResponse.headers()))
            .sentRequestAtMillis(networkResponse.sentRequestAtMillis())
            .receivedResponseAtMillis(networkResponse.receivedResponseAtMillis())
            .cacheResponse(stripBody(cacheResponse))
            .networkResponse(stripBody(networkResponse))
            .build();
        networkResponse.body().close();

        // Update the cache after combining headers but before stripping the
        // Content-Encoding header (as performed by initContentStream()).
        cache.trackConditionalCacheHit();
        cache.update(cacheResponse, response);
        return response;
      } else {
        closeQuietly(cacheResponse.body());
      }
    }

    Response response = networkResponse.newBuilder()
        .cacheResponse(stripBody(cacheResponse))
        .networkResponse(stripBody(networkResponse))
        .build();

    if (cache != null) {
      if (HttpHeaders.hasBody(response) && CacheStrategy.isCacheable(response, networkRequest)) {
        // Offer this request to the cache.
        CacheRequest cacheRequest = cache.put(response);
        return cacheWritingResponse(cacheRequest, response);
      }

      if (HttpMethod.invalidatesCache(networkRequest.method())) {
        try {
          cache.remove(networkRequest);
        } catch (IOException ignored) {
          // The cache cannot be written.
        }
      }
    }

    return response;
  }
根据名称可以看出,此拦截器主要负责缓存的处理,判断后,假如有符合要求的缓存就将其返回,另外更新当前的缓存,以及假如缓存失效了,就删掉此次缓存。另外上面有缓存策略是如何进行的,后面再看。记住这几行代码,就是获取缓存的:
1
2
3
4
5
6
7
  Response cacheCandidate = cache != null
        ? cache.get(chain.request())
        : null;
    long now = System.currentTimeMillis();
    CacheStrategy strategy = new CacheStrategy.Factory(now, chain.request(), cacheCandidate).get();
    Request networkRequest = strategy.networkRequest;
    Response cacheResponse = strategy.cacheResponse;
ConnectInterceptor
ConnectInterceptor的代码较少,但是关键在于StreamAllocation。
1
2
3
4
5
6
7
8
9
10
11
12
13
14
15
16
17
18
19
20
21
22
23
24
25
26
27
28
29
30
31
32
33
@Override public Response intercept(Chain chain) throws IOException {
    RealInterceptorChain realChain = (RealInterceptorChain) chain;
    Request request = realChain.request();
    StreamAllocation streamAllocation = realChain.streamAllocation();

    // We need the network to satisfy this request. Possibly for validating a conditional GET.
    boolean doExtensiveHealthChecks = !request.method().equals("GET");
    HttpCodec httpCodec = streamAllocation.newStream(client, doExtensiveHealthChecks);
    RealConnection connection = streamAllocation.connection();

    return realChain.proceed(request, streamAllocation, httpCodec, connection);
  }
StreamAllocation`上面说根据是不是`GET`请求,有一个判断,跟代码看一下:`streamAllocation.newStream(client, doExtensiveHealthChecks)
// StreamAllocation.java
public HttpCodec newStream(OkHttpClient client, boolean doExtensiveHealthChecks) {
    int connectTimeout = client.connectTimeoutMillis();
    int readTimeout = client.readTimeoutMillis();
    int writeTimeout = client.writeTimeoutMillis();
    boolean connectionRetryEnabled = client.retryOnConnectionFailure();

    try {
      RealConnection resultConnection = findHealthyConnection(connectTimeout, readTimeout,
          writeTimeout, connectionRetryEnabled, doExtensiveHealthChecks);
      HttpCodec resultCodec = resultConnection.newCodec(client, this);

      synchronized (connectionPool) {
        codec = resultCodec;
        return resultCodec;
      }
    } catch (IOException e) {
      throw new RouteException(e);
    }
  }
这个地方会实例化一个HttpCodec对象,他是负责编码和解码对应的请求和响应的,同样会判断连接是否健康,需不需要重新建立连接等。
CallServerInterceptor
CallServerInterceptor才是真正负责和服务端交互的,也是拦截器的最后一个。主要是建立连接,通过httpcode发起请求,以及再接收到响应之后,读取响应码,判断,最终返回Response的对象。
1
2
3
4
5
6
7
8
9
10
11
12
13
14
15
16
17
18
19
20
21
22
23
24
25
26
27
28
29
30
31
32
33
34
35
36
37
38
39
40
41
42
43
44
45
46
47
48
49
50
51
52
53
54
55
56
57
58
59
60
61
62
63
64
65
66
67
68
69
70
71
72
@Override
public Response intercept(Chain chain) throws IOException {
    RealInterceptorChain realChain = (RealInterceptorChain) chain;
    HttpCodec httpCodec = realChain.httpStream();
    StreamAllocation streamAllocation = realChain.streamAllocation();
    RealConnection connection = (RealConnection) realChain.connection();
    Request request = realChain.request();

    long sentRequestMillis = System.currentTimeMillis();
    httpCodec.writeRequestHeaders(request);

    Response.Builder responseBuilder = null;
    if (HttpMethod.permitsRequestBody(request.method()) && request.body() != null) {
      // If there's a "Expect: 100-continue" header on the request, wait for a "HTTP/1.1 100
      // Continue" response before transmitting the request body. If we don't get that, return what
      // we did get (such as a 4xx response) without ever transmitting the request body.
      if ("100-continue".equalsIgnoreCase(request.header("Expect"))) {
        httpCodec.flushRequest();
        responseBuilder = httpCodec.readResponseHeaders(true);
      }

      if (responseBuilder == null) {
        // Write the request body if the "Expect: 100-continue" expectation was met.
        Sink requestBodyOut = httpCodec.createRequestBody(request, request.body().contentLength());
        BufferedSink bufferedRequestBody = Okio.buffer(requestBodyOut);
        request.body().writeTo(bufferedRequestBody);
        bufferedRequestBody.close();
      } else if (!connection.isMultiplexed()) {
        // If the "Expect: 100-continue" expectation wasn't met, prevent the HTTP/1 connection from
        // being reused. Otherwise we're still obligated to transmit the request body to leave the
        // connection in a consistent state.
        streamAllocation.noNewStreams();
      }
    }

    httpCodec.finishRequest();

    if (responseBuilder == null) {
      responseBuilder = httpCodec.readResponseHeaders(false);
    }

    Response response = responseBuilder
        .request(request)
        .handshake(streamAllocation.connection().handshake())
        .sentRequestAtMillis(sentRequestMillis)
        .receivedResponseAtMillis(System.currentTimeMillis())
        .build();

    int code = response.code();
    if (forWebSocket && code == 101) {
      // Connection is upgrading, but we need to ensure interceptors see a non-null response body.
      response = response.newBuilder()
          .body(Util.EMPTY_RESPONSE)
          .build();
    } else {
      response = response.newBuilder()
          .body(httpCodec.openResponseBody(response))
          .build();
    }

    if ("close".equalsIgnoreCase(response.request().header("Connection"))
        || "close".equalsIgnoreCase(response.header("Connection"))) {
      streamAllocation.noNewStreams();
    }

    if ((code == 204 || code == 205) && response.body().contentLength() > 0) {
      throw new ProtocolException(
          "HTTP " + code + " had non-zero Content-Length: " + response.body().contentLength());
    }

    return response;
  }
其中io读写,是用okio包做的。
缓存策略
连接池 ConnectionPool
HttpClient、OKhttp、RestTemplate对比
一、三者的对比
- HttpClient:代码复杂,还得操心资源回收等。
代码很复杂,冗余代码多,不建议直接使用。 - RestTemplate: 是
Spring 提供的用于访问Rest服务的客户端, RestTemplate 提供了多种便捷访问远程Http服务的方法,能够大大提高客户端的编写效率。 - okhttp:OkHttp是一个高效的HTTP客户端,
允许所有同一个主机地址的请求共享同一个socket连接;连接池减少请求延时;透明的GZIP压缩减少响应数据的大小;缓存响应内容,避免一些完全重复的请求
二、HttpClient的使用
https://blog.csdn.net/cristianoxm/article/details/120943347
HttpClient是Apache Jakarta Common下的子项目,用来提供高效的、最新的、功能丰富的支持HTTP协议的客户端编程工具包,并且它支持HTTP协议最新的版本和建议。HttpClient已经应用在很多的项目中,比如Apache Jakarta上很著名的另外两个开源项目Cactus和HTMLUnit都使用了HttpClient。
- 使用HttpClient发送请求、接收响应很简单,一般需要如下几步即可。
- 创建HttpClient对象。
- 创建请求方法的实例,并指定请求URL。如果需要发送GET请求,创建HttpGet对象;如果需要发送POST请求,创建HttpPost对象。
- 如果需要发送请求参数,可调用HttpGet、HttpPost共同的setParams(HetpParams params)方法来添加请求参数;对于HttpPost对象而言,也可调用setEntity(HttpEntity entity)方法来设置请求参数。
- 调用HttpClient对象的execute(HttpUriRequest request)发送请求,该方法返回一个HttpResponse。
- 调用HttpResponse的getAllHeaders()、getHeaders(String name)等方法可获取服务器的响应头;调用HttpResponse的getEntity()方法可获取HttpEntity对象,该对象包装了服务器的响应内容。程序可通过该对象获取服务器的响应内容。
- 释放连接。无论执行方法是否成功,都必须释放连接
- httpClient–Get
1
2
3
4
5
6
7
8
9
10
11
12
13
14
15
16
17
18
19
20
21
22
23
public class HttpClientExample_get {
    public static void main(String[] args) throws IOException {
        HttpGet request = new HttpGet("https://httpbin.org/get");
        // add request headers
        request.addHeader("custom-key", "test");
        request.addHeader(HttpHeaders.USER_AGENT, "Googlebot");
        try (CloseableHttpClient httpClient = HttpClients.createDefault();
             CloseableHttpResponse response = httpClient.execute(request)) {
            // Get HttpResponse Status
            System.out.println(response.getProtocolVersion());              // HTTP/1.1
            System.out.println(response.getStatusLine().getStatusCode());   // 200
            System.out.println(response.getStatusLine().getReasonPhrase()); // OK
            System.out.println(response.getStatusLine().toString());        // HTTP/1.1 200 OK
            HttpEntity entity = response.getEntity();
            if (entity != null) {
                // return it as a String
                String result = EntityUtils.toString(entity);
                System.out.println(result);
            }
        }
    }
}
12345678910111213141516171819202122
- httpClient–Post
1
2
3
4
5
6
7
8
9
10
11
12
13
14
15
16
17
18
19
20
21
22
23
24
25
26
27
public class HttpClientExample_post {
    public static void main(String[] args) {
        try {
            String result = sendPOST("https://httpbin.org/post");
            System.out.println(result);
        } catch (IOException e) {
            e.printStackTrace();
        }
    }
    private static String sendPOST(String url) throws IOException {
        String result = "";
        HttpPost post = new HttpPost(url);
        // add request parameters or form parameters
        List<NameValuePair> urlParameters = new ArrayList<>();
        urlParameters.add(new BasicNameValuePair("username", "abc"));
        urlParameters.add(new BasicNameValuePair("password", "123"));
        urlParameters.add(new BasicNameValuePair("custom", "secret"));
        post.setEntity(new UrlEncodedFormEntity(urlParameters));
        try (CloseableHttpClient httpClient = HttpClients.createDefault();
             CloseableHttpResponse response = httpClient.execute(post)){

            result = EntityUtils.toString(response.getEntity());
        }
        return result;
    }
}
1234567891011121314151617181920212223242526
- httpClient–PostWithJson
1
2
3
4
5
6
7
8
9
10
11
12
13
14
15
16
17
18
19
20
21
22
23
24
25
26
27
28
29
public class HttpClientExample_JsonPost {
    public static void main(String[] args) {
        try {
            String result = sendPOST("https://httpbin.org/post");
            System.out.println(result);
        } catch (IOException e) {
            e.printStackTrace();
        }

    }
    private static String sendPOST(String url) throws IOException {

        String result = "";
        HttpPost post = new HttpPost(url);

        String json = "{" +
                "\"name\":\"mkyong\"," +
                "\"notes\":\"hello\"" +
                "}";
        // send a JSON data
        post.setEntity(new StringEntity(json));
        try (CloseableHttpClient httpClient = HttpClients.createDefault();
             CloseableHttpResponse response = httpClient.execute(post)) {
            result = EntityUtils.toString(response.getEntity());
        }
        return result;
    }
}
12345678910111213141516171819202122232425262728
- HttpClient认证
1
2
3
4
5
6
7
8
9
10
11
12
13
14
15
16
17
18
19
20
21
22
23
24
public class HttpClientAuthentication {
    public static void main(String[] args) throws IOException {
        HttpGet request = new HttpGet("http://localhost:8080/books");
        CredentialsProvider provider = new BasicCredentialsProvider();
        provider.setCredentials(
                AuthScope.ANY,
                new UsernamePasswordCredentials("user", "password")
        );
        try (CloseableHttpClient httpClient = HttpClientBuilder.create()
                .setDefaultCredentialsProvider(provider)
                .build();
             CloseableHttpResponse response = httpClient.execute(request)) {
            // 401 if wrong user/password
            System.out.println(response.getStatusLine().getStatusCode());

            HttpEntity entity = response.getEntity();
            if (entity != null) {
                // return it as a String
                String result = EntityUtils.toString(entity);
                System.out.println(result);
            }
        }
    }
}
https://www.cnblogs.com/jepson6669/p/9358244.html
https://blog.csdn.net/cyan20115/article/details/106550874
三、OKHttp的使用
- 出现背景 网络访问的高效性要求,可以说是
为高效而生 - 解决思路
- 提供了对 HTTP/2 和 SPDY 的支持,这使得对同一个主机发出的所有请求都可以共享相同的套接字连接
- 如果 HTTP/2 和 SPDY 不可用,OkHttp会使用连接池来复用连接以提高效率
- 提供了对 GZIP 的默认支持来降低传输内容的大小
- 提供了对 HTTP 响应的缓存机制,可以避免不必要的网络请求
- 当网络出现问题时,OkHttp 会自动重试一个主机的多个 IP 地址
- OkHttp3设计思路

- Requests(请求): 每一个HTTP请求中都应该包含一个URL,一个GET或POST方法以及Header或其他参数,当然还可以含特定内容类型的数据流。
- Responses(响应): 响应则包含一个回复代码(200代表成功,404代表未找到),Header和定制可选的body。
- 代码
- pom.xml
1
2
3
4
5
6
7
<!-- https://mvnrepository.com/artifact/com.squareup.okhttp3/okhttp -->
<dependency>
    <groupId>com.squareup.okhttp3</groupId>
    <artifactId>okhttp</artifactId>
    <version>4.9.1</version>
</dependency>
123456
- 创建OkHttpClient实例
简单来说,通过OkHttpClient可以发送一个Http请求,并读取该Http请求的响应,它是一个生产Call的工厂。此外,受益于一个共享的响应缓存/线程池/复用的连接等因素,绝大多数应用使用一个OkHttpClient实例,便可以满足整个应用的Http请求。
三种创建实例的方法:
- 创建一个默认配置OkHttpClient,可以使用默认的构造函数。
- 通过new OkHttpClient.Builder()方法来一步一步配置一个OkHttpClient实例。
- 如果要求使用现有的实例,可以通过newBuilder()方法来进行构造。
1
2
3
4
5
6
OkHttpClient client = new OkHttpClient();
OkHttpClient clientWith30sTimeout = client.Builder()
    .readTimeout(30, TimeUnit.SECONDS)
    .build();
OkHttpClient client  = client.newBuilder().build();
12345
看一下OkHttpClient的源码,会发现缓存/代理等等需求,一应俱全的按照类封装到了Builder中。
1
2
3
4
5
6
7
8
9
10
11
12
13
14
15
16
17
18
19
20
21
22
23
24
25
Dispatcher dispatcher;          // 分发
Proxy proxy;                    // 代理
List<Protocol> protocols;
List<ConnectionSpec> connectionSpecs;
final List<Interceptor> interceptors = new ArrayList<>(); // 拦截器
final List<Interceptor> networkInterceptors = new ArrayList<>(); // 网络拦截器
ProxySelector proxySelector;
CookieJar cookieJar;
Cache cache;    // 缓存
InternalCache internalCache;
SocketFactory socketFactory;
SSLSocketFactory sslSocketFactory;
HostnameVerifier hostnameVerifier;
CertificatePinner certificatePinner;
Authenticator proxyAuthenticator;   // 代理证书
Authenticator authenticator;        // 证书
ConnectionPool connectionPool;
Dns dns;        // DNS
boolean followSslRedirects;
boolean followRedirects;
boolean retryOnConnectionFailure;
int connectTimeout;
int readTimeout;
int writeTimeout;
123456789101112131415161718192021222324
- okhttp–get
1
2
3
4
5
6
7
8
9
OkHttpClient client = new OkHttpClient();
String run(String url) throws IOException {
  Request request = new Request.Builder()
      .url(url)
      .build();
  Response response = client.newCall(request).execute();
  return response.body().string();
}
12345678
- Request
简单看一下Request类,可以发现它代表一个Http请求,需要注意的是Request一旦build()之后,便不可修改。主要通过new Request.Builder()来一步一步构造的。看一下Builder的代码。
1
2
3
4
5
public Builder() {
  this.method = "GET";
  this.headers = new Headers.Builder();
}
1234
- 默认是Get方法,
此外还创建了头信息。Headers类中是通过List<String> namesAndValues = new ArrayList<>(20),来存放头信息的,一开始我也很纳闷,头信息都是一对一对的为什么要用List,看一下源码发现,在存取的时候都是将索引+2或者-2。并且头信息可以存在多个相同的Key信息。
- 发起请求
跟到newCall()方法中发现,又使用OkHttpClient实例和Request的实例,一起构造了一个RealCall的实例。RealCall类简单做了一个托管并通过Dispather类对请求进行分发和执行,实际开启线程发起请求的方法就在这个类中。随后又调用execute()方法,拿到了一个响应。这个execute()方法,实际上执行的就是RealCall中的execute()方法,最后调用了Dispatcher的execute()方法。
- Response
Response代表一个Http的响应,这个类的实例不可修改。
一个简单的Get请求和说明就结束了
- okhttp–post
- POST提交字符串
1
2
3
4
5
6
7
8
9
10
11
12
13
public static final MediaType JSON
    = MediaType.parse("application/json; charset=utf-8");
OkHttpClient client = new OkHttpClient();
String post(String url, String json) throws IOException {
  RequestBody body = RequestBody.create(JSON, json);
  Request request = new Request.Builder()
      .url(url)
      .post(body)
      .build();
  Response response = client.newCall(request).execute();
  return response.body().string();
}
123456789101112
MediaType用于描述Http请求和响应体的内容类型,也就是Content-Type。一次请求就是向目标服务器发送一串文本。什么样的文本?有下面结构的文本。 
- 例子
1
2
3
4
5
6
7
8
POST /meme.php/home/user/login HTTP/1.1
Host: 114.215.86.90
Cache-Control: no-cache
Postman-Token: bd243d6b-da03-902f-0a2c-8e9377f6f6ed
Content-Type: application/x-www-form-urlencoded

tel=13637829200&password=123456
1234567
例如,MediaType.parse(“application/json; charset=utf-8”);这个就带表请求体的类型为JSON格式的。定义好数据类型,还要将其变为请求体,最后通过post()方法,随请求一并发出。
- POST提交键值对
OkHttp也可以通过POST方式把键值对数据传送到服务器
1
2
3
4
5
6
7
8
9
10
11
12
13
14
15
16
17
18
19
OkHttpClient client = new OkHttpClient();
String post(String url, String json) throws IOException {
    RequestBody formBody = new FormBody.Builder()
    .add("platform", "android")
    .add("name", "bug")
    .add("subject", "XXXXXXXXXXXXXXX")
    .build();
    Request request = new Request.Builder()
      .url(url)
      .post(formBody)
      .build();
    Response response = client.newCall(request).execute();
    if (response.isSuccessful()) {
        return response.body().string();
    } else {
        throw new IOException("Unexpected code " + response);
    }
}
123456789101112131415161718
- HTTP头部的设置和读取
HTTP 头的数据结构是 Map<String, List<String>>类型。也就是说,对于每个 HTTP 头,可能有多个值。但是大部分 HTTP 头都只有一个值,只有少部分 HTTP 头允许多个值。至于name的取值说明,可以查看这个请求头大全。
OkHttp的处理方式是:
- 使用header(name,value)来设置HTTP头的唯一值,如果请求中已经存在响应的信息那么直接替换掉。
- 使用addHeader(name,value)来补充新值,如果请求头中已经存在name的name-value,那么还会继续添加,请求头中便会存在多个name相同而value不同的“键值对”。
- 使用header(name)读取唯一值或多个值的最后一个值
- 使用headers(name)获取所有值
1
2
3
4
5
6
7
8
9
10
11
12
13
OkHttpClient client = new OkHttpClient();
Request request = new Request.Builder()
        .url("https://github.com")
        .header("User-Agent", "My super agent")
        .addHeader("Accept", "text/html")
        .build();
Response response = client.newCall(request).execute();
if (!response.isSuccessful()) {
    throw new IOException("服务器端错误: " + response);
}
System.out.println(response.header("Server"));
System.out.println(response.headers("Set-Cookie"));
123456789101112
https://www.cnblogs.com/it-tsz/p/11748674.html
四、RestTemplate的使用
RestTemplate 是从 Spring3.0 开始支持的一个 HTTP 请求工具,它提供了常见的REST请求方案的模版,例如 GET 请求、POST 请求、PUT 请求、DELETE 请求以及一些通用的请求执行方法 exchange 以及 execute。RestTemplate 继承自 InterceptingHttpAccessor 并且实现了 RestOperations 接口,其中 RestOperations 接口定义了基本的 RESTful 操作,这些操作在 RestTemplate 中都得到了实现。
- pom.xml
1
2
3
4
5
<dependency>
    <groupId>org.springframework.boot</groupId>
    <artifactId>spring-boot-starter-web</artifactId>
</dependency>
1234
- 初始化(3种)
1
2
3
4
RestTemplate restTemplate = new RestTemplate();
RestTemplate restTemplate = new RestTemplate(new HttpComponentsClientHttpRequestFactory());
RestTemplate restTemplate = new RestTemplate(new OkHttp3ClientHttpRequestFactory());
123
当然如果想使用OkHttp的话也得引入相应的jar包
- 默认配置
默认情况下RestTemplate自动帮我们注册了一组HttpMessageConverter用来处理一些不同的contentType的请求。如果现有的转换器不能满足你的需求,你还可以实现org.springframework.http.converter.HttpMessageConverter接口自己写一个。详情参考官方api。其他相关的配置,也可以在官方文档中查看。当然,对于一个请求来说,超期时间,请求连接时间等都是必不可少的参数,为了更好的适应业务需求,所以可以自己修改restTemplate的配置。
- RestTemplate使用总结
- RestTemplate提供了六种常用的HTTP方法实现远程服务调用,
RestTemplate的方法名遵循一定的命名规范,第一部分表示用哪种HTTP方法调用(get,post),第二部分表示返回类型。- getForObject – 发送GET请求,
将HTTP response转换成一个指定的object对象- postForEntity –发送POST请求,
将给定的对象封装到HTTP请求体,返回类型是一个HttpEntity对象(包含响应数据和响应头)- 每个HTTP方法对应的RestTemplate方法都有3种。
其中2种的url参数为字符串,URI参数变量分别是Object数组和Map,第3种使用URI类型作为参数- exchange 和execute方法比上面列出的其它方法(如getForObject、postForEntity等)使用范围更广,
允许调用者指定HTTP请求的方法(GET、POST、PUT等),并且可以支持像HTTP PATCH(部分更新)。
- GET 请求
做好了准备工作,先来看使用 RestTemplate 发送 GET 请求。在 RestTemplate 中,和 GET 请求相关的方法有如下几个: 
- 代码
1
2
3
4
5
6
7
8
9
10
11
12
13
14
15
16
17
18
19
20
21
22
23
24
25
26
public class TemplateGet {
    public static void main(String[] args) throws UnsupportedEncodingException {
        //生成一个设置了连接超时时间、请求超时时间、异常重试次数3次
        RequestConfig config = RequestConfig.custom().setConnectionRequestTimeout(10000).setConnectTimeout(10000).setSocketTimeout(30000).build();
        HttpClientBuilder builder = HttpClientBuilder.create().setDefaultRequestConfig(config).setRetryHandler(new DefaultHttpRequestRetryHandler(3, false));
        HttpClient httpClient = builder.build();
        ClientHttpRequestFactory requestFactory = new HttpComponentsClientHttpRequestFactory(httpClient);
        RestTemplate restTemplate = new RestTemplate(requestFactory);

        //三种方式请求
        String forObject = restTemplate.getForObject("https://httpbin.org/get", String.class);
        ResponseEntity<String> forEntity = restTemplate.getForEntity("https://httpbin.org/get", String.class);
        ResponseEntity<String> responseEntity = restTemplate.exchange("https://httpbin.org/get", HttpMethod.GET, null, String.class);
        //遍历响应头
        System.out.println("响应头--start");
        forEntity.getHeaders().entrySet().forEach(System.out::println);
        System.out.println("响应头--end");
        assert forObject != null;
        byte[] bytes = forObject.getBytes(StandardCharsets.UTF_8);
        String res = new String(bytes, StandardCharsets.UTF_8);
        System.out.println(res);
        System.out.println(forEntity.getBody());
        System.out.println(responseEntity.getBody());
    }
}
12345678910111213141516171819202122232425
- post请求

- json形式
1
2
3
4
5
6
7
8
9
10
11
12
13
14
15
16
17
18
19
20
21
22
23
24
25
26
27
28
29
30
31
32
33
34
public class TemplatePostJson {
    public static void main(String[] args) {
        //生成一个设置了连接超时时间、请求超时时间、异常重试次数3次
        RequestConfig config = RequestConfig.custom().setConnectionRequestTimeout(10000).setConnectTimeout(10000).setSocketTimeout(30000).build();
        HttpClientBuilder builder = HttpClientBuilder.create().setDefaultRequestConfig(config).setRetryHandler(new DefaultHttpRequestRetryHandler(3, false));
        HttpClient httpClient = builder.build();
        ClientHttpRequestFactory requestFactory = new HttpComponentsClientHttpRequestFactory(httpClient);
        RestTemplate restTemplate = new RestTemplate(requestFactory);
        String url = "https://httpbin.org/post";
        String json = "{" +
                "\"name\":\"mkyong\"," +
                "\"notes\":\"hello\"" +
                "}";
        HttpHeaders headers = new HttpHeaders();
        headers.setContentType(MediaType.APPLICATION_JSON);//Content-Type
        headers.set("CustomHeader", "myCustom"); //Other headers
        HttpEntity<String> httpEntity = new HttpEntity<>(json, headers);

        //三种方式请求
        ResponseEntity<String> responseEntity = restTemplate.exchange(url, HttpMethod.POST, httpEntity, String.class);
        String s = restTemplate.postForObject(url, httpEntity, String.class);
        ResponseEntity<String> stringResponseEntity = restTemplate.postForEntity(url, httpEntity, String.class);

        assert s != null;
        byte[] bytes = s.getBytes(StandardCharsets.UTF_8);
        String body=new String(bytes,StandardCharsets.UTF_8);
        System.out.println(body);
        System.out.println(responseEntity.getBody());
        System.out.println("响应头--start");
        stringResponseEntity.getHeaders().entrySet().forEach(System.out::println);
        System.out.println("响应头--end");
    }
}
123456789101112131415161718192021222324252627282930313233
- map(表单)形式
1
2
3
4
5
6
7
8
9
10
11
12
13
14
15
16
17
18
19
20
21
22
23
24
25
26
27
28
29
30
31
32
33
34
35
36
37
public class TemplatePostMap {
    public static void main(String[] args) {
        //生成一个设置了连接超时时间、请求超时时间、异常重试次数3次
        RequestConfig config = RequestConfig.custom().setConnectionRequestTimeout(10000).setConnectTimeout(10000).setSocketTimeout(30000).build();
        HttpClientBuilder builder = HttpClientBuilder.create().setDefaultRequestConfig(config).setRetryHandler(new DefaultHttpRequestRetryHandler(3, false));
        HttpClient httpClient = builder.build();
        ClientHttpRequestFactory requestFactory = new HttpComponentsClientHttpRequestFactory(httpClient);
        RestTemplate restTemplate = new RestTemplate(requestFactory);

        String url = "https://httpbin.org/post";


        MultiValueMap<Object, Object> map = new LinkedMultiValueMap<>();
        map.add("aa", "aa");
        map.add("bb", "bb");
        map.add("cc", "cc");
        HttpHeaders headers = new HttpHeaders();
        headers.setContentType(MediaType.APPLICATION_JSON);//Content-Type
        headers.set("CustomHeader", "myCustom"); //Other headers
        HttpEntity<MultiValueMap<Object, Object>> httpEntity = new HttpEntity<>(map, headers);

        //三种方式请求
        ResponseEntity<String> responseEntity = restTemplate.exchange(url, HttpMethod.POST, httpEntity, String.class);
        String s = restTemplate.postForObject(url, httpEntity, String.class);
        ResponseEntity<String> stringResponseEntity = restTemplate.postForEntity(url, httpEntity, String.class);

        assert s != null;
        byte[] bytes = s.getBytes(StandardCharsets.UTF_8);
        String body=new String(bytes,StandardCharsets.UTF_8);
        System.out.println(body);
        System.out.println(responseEntity.getBody());
        System.out.println("响应头--start");
        stringResponseEntity.getHeaders().entrySet().forEach(System.out::println);
        System.out.println("响应头--end");
    }
}
123456789101112131415161718192021222324252627282930313233343536
其实,如果参数是一个 MultiValueMap 的实例,则以 key/value 的形式发送,如果是一个普通对象,则会被转成 json 发送。
- postForLocation
postForLocation 方法的返回值是一个 URL 对象,因为 POST 请求一般用来添加数据,有的时候需要将刚刚添加成功的数据的 URL 返回来,此时就可以使用这个方法,一个常见的使用场景如用户注册功能,用户注册成功之后,可能就自动跳转到登录页面了,此时就可以使用该方法。
- PUT 请求
只要将 GET 请求和 POST 请求搞定了,接下来 PUT 请求就会容易很多了,PUT 请求本身方法也比较少,只有三个,如下:  这三个重载的方法
其参数其实和 POST 是一样的,可以用 key/value 的形式传参,也可以用 JSON 的形式传参,无论哪种方式,都是没有返回值的
- DELETE 请求
和 PUT 请求一样,DELETE 请求也是比较简单的,只有三个方法,如下:
 不同于 POST 和 PUT ,
DELETE 请求的参数只能在地址栏传送,可以是直接放在路径中,也可以用 key/value 的形式传递,当然,这里也是没有返回值的。
1
2
3
4
5
6
7
8
9
10
11
12
13
14
15
16
17
18
19
20
public class TemplateDeleteJson {
    public static void main(String[] args) {
        //生成一个设置了连接超时时间、请求超时时间、异常重试次数3次
        RequestConfig config = RequestConfig.custom().setConnectionRequestTimeout(10000).setConnectTimeout(10000).setSocketTimeout(30000).build();
        HttpClientBuilder builder = HttpClientBuilder.create().setDefaultRequestConfig(config).setRetryHandler(new DefaultHttpRequestRetryHandler(3, false));
        HttpClient httpClient = builder.build();
        ClientHttpRequestFactory requestFactory = new HttpComponentsClientHttpRequestFactory(httpClient);
        RestTemplate restTemplate = new RestTemplate(requestFactory);
        String url = "https://httpbin.org/delete";
        String json = "{" +
                "\"name\":\"mkyong\"," +
                "\"notes\":\"hello\"" +
                "}";
        HttpHeaders headers = new HttpHeaders();
        headers.setContentType(MediaType.APPLICATION_JSON);//Content-Type
        headers.set("CustomHeader", "myCustom"); //Other headers
        HttpEntity<String> httpEntity = new HttpEntity<>(json, headers);
        restTemplate.delete(url,httpEntity);
    }
}
https://www.jianshu.com/p/2a59bb937d21 https://www.cnblogs.com/vegetableDD/p/11619390.html https://blog.csdn.net/bobozai86/article/details/110450461