数据库学习
MYSQL游标查询
通过JDBC对MySQL进行数据查询时,有个很容易踩的坑,以下面代码为例:
1
2
3
4
5
6
7
8
9
10
11
12
13
    public static void selectNormal() throws SQLException{
        Connection connection = DriverManager.getConnection("jdbc:mysql://localhost:3306/test", "root", "123456");
        PreparedStatement statement = connection.prepareStatement("select * from test",ResultSet.TYPE_FORWARD_ONLY,ResultSet.CONCUR_READ_ONLY);
        //statement.setFetchSize(100);
        ResultSet resultSet = statement.executeQuery();

        while(resultSet.next()){
            System.out.println(resultSet.getString(1));
        }
        resultSet.close();
        statement.close();
        connection.close();
    }
这段代码在查询结果数据条数较大时则会出现内存溢出OOM问题:
为了更容易模拟错误,可将jvm内存设置较小,增加jvm参数 -Xms16m -Xmx16m
1
2
3
4
5
6
7
8
9
10
11
12
13
Exception in thread "main" java.lang.OutOfMemoryError: Java heap space
   at com.mysql.jdbc.MysqlIO.nextRowFast(MysqlIO.java:2213)
   at com.mysql.jdbc.MysqlIO.nextRow(MysqlIO.java:1992)
   at com.mysql.jdbc.MysqlIO.readSingleRowSet(MysqlIO.java:3413)
   at com.mysql.jdbc.MysqlIO.getResultSet(MysqlIO.java:471)
   at com.mysql.jdbc.MysqlIO.readResultsForQueryOrUpdate(MysqlIO.java:3115)
   at com.mysql.jdbc.MysqlIO.readAllResults(MysqlIO.java:2344)
   at com.mysql.jdbc.MysqlIO.sqlQueryDirect(MysqlIO.java:2739)
   at com.mysql.jdbc.ConnectionImpl.execSQL(ConnectionImpl.java:2486)
   at com.mysql.jdbc.PreparedStatement.executeInternal(PreparedStatement.java:1858)
   at com.mysql.jdbc.PreparedStatement.executeQuery(PreparedStatement.java:1966)
   at com.cmbc.dap.dao.test.MysqlBatchTest.selectNormal(MysqlBatchTest.java:46)
   at com.cmbc.dap.dao.test.MysqlBatchTest.main(MysqlBatchTest.java:13)
你可能会说设置fetchSize即可,但不幸的是,将上述代码设置fetchSize代码注释打开,依然会报出同样错误,fetchSize并没有生效,MySQL仍然一股脑将所有数据加载到内存,直到撑爆。 对于大数据量下查询,如果才能保证应用程序正确运行呢?寻根溯源,我们还是通过查看MySQL驱动源码来找答案。
MySQL驱动 查询实现原理
com.mysql.jdbc.PreparedStatement
1
2
3
4
5
6
7
8
9
10
11
12
13
14
15
16
17
18
19
20
21
22
23
24
25
26
27
28
29
30
31
32
33
34
35
36
37
38
39
40
41
42
43
44
45
46
47
48
49
50
51
52
53
54
55
56
57
58
59
60
61
62
63
64
65
66
public java.sql.ResultSet executeQuery() throws SQLException {
        synchronized (checkClosed().getConnectionMutex()) {

            MySQLConnection locallyScopedConn = this.connection;

            checkForDml(this.originalSql, this.firstCharOfStmt);

            this.batchedGeneratedKeys = null;

            resetCancelledState();

            implicitlyCloseAllOpenResults();

            clearWarnings();

            if (this.doPingInstead) {
                doPingInstead();

                return this.results;
            }

            setupStreamingTimeout(locallyScopedConn);

            Buffer sendPacket = fillSendPacket();

            String oldCatalog = null;

            if (!locallyScopedConn.getCatalog().equals(this.currentCatalog)) {
                oldCatalog = locallyScopedConn.getCatalog();
                locallyScopedConn.setCatalog(this.currentCatalog);
            }

            //
            // Check if we have cached metadata for this query...
            //
            CachedResultSetMetaData cachedMetadata = null;
            if (locallyScopedConn.getCacheResultSetMetadata()) {
                cachedMetadata = locallyScopedConn.getCachedMetaData(this.originalSql);
            }

            Field[] metadataFromCache = null;

            if (cachedMetadata != null) {
                metadataFromCache = cachedMetadata.fields;
            }

            locallyScopedConn.setSessionMaxRows(this.maxRows);

            this.results = executeInternal(this.maxRows, sendPacket, createStreamingResultSet(), true, metadataFromCache, false);

            if (oldCatalog != null) {
                locallyScopedConn.setCatalog(oldCatalog);
            }

            if (cachedMetadata != null) {
                locallyScopedConn.initializeResultsMetadataFromCache(this.originalSql, cachedMetadata, this.results);
            } else {
                if (locallyScopedConn.getCacheResultSetMetadata()) {
                    locallyScopedConn.initializeResultsMetadataFromCache(this.originalSql, null /* will be created */, this.results);
                }
            }
            this.lastInsertId = this.results.getUpdateID();

            return this.results;
        }
    }
上面代码中我们特别注意createStreamingResultSet方法,此方法返回是否创建流式结果集,即采用流式查询。流式查询与普通查询不同之处在于并不是一次性将所有数据加载到内存,在调用next()方法时,MySQL驱动只从网络数据流获取到1条数据,然后返回应用,这样就避免了内存溢出问题。我们看下该方法的实现:
1
2
3
4
5
6
7
8
9
10
11
 /**
     * We only stream result sets when they are forward-only, read-only, and the
     * fetch size has been set to Integer.MIN_VALUE
     *
     * @return true if this result set should be streamed row at-a-time, rather
     *         than read all at once.
     */
    protected boolean createStreamingResultSet() {
        return ((this.resultSetType == java.sql.ResultSet.TYPE_FORWARD_ONLY) && (this.resultSetConcurrency == java.sql.ResultSet.CONCUR_READ_ONLY)
                && (this.fetchSize == Integer.MIN_VALUE));
    }
可以看到满足这三个条件即会采用流式查询,前面两个其实就是MySQL创建Statement的默认的游标类型,在PreparedStatement类我们可以看到
1
2
3
4
5
6
7
    private static final int DEFAULT_RESULT_SET_TYPE = ResultSet.TYPE_FORWARD_ONLY;
    private static final int DEFAULT_RESULT_SET_CONCURRENCY = ResultSet.CONCUR_READ_ONLY;
    public java.sql.PreparedStatement prepareStatement(String sql)
            throws SQLException {
        return prepareStatement(sql, DEFAULT_RESULT_SET_TYPE,
                DEFAULT_RESULT_SET_CONCURRENCY);
    }
因此创建statement,不指定后面两个参数默认也是满足流式查询的条件的。
1
PreparedStatement statement = connection.prepareStatement("select * from test");
而第三个条件却很奇怪,fetchSize必须为Integer.MIN_VALUE即-2147483648,而这样一个负数是MySQL自定义的的特殊含义值,在JDBC接口规范并无此说明。至此我们就知道了如何使用流式查询了,修改代码如下:
1
2
3
4
5
6
7
8
9
10
11
12
13
14
15
16
17
18
public static void selectStream() throws SQLException{
        Connection connection = DriverManager.getConnection("jdbc:mysql://localhost:3306/test", "root", "123456");
        PreparedStatement statement = connection.prepareStatement("select * from test",ResultSet.TYPE_FORWARD_ONLY,ResultSet.CONCUR_READ_ONLY);
        statement.setFetchSize(Integer.MIN_VALUE);

        long begin = System.currentTimeMillis();
        ResultSet resultSet = statement.executeQuery();

        while(resultSet.next()){
            //System.out.println(resultSet.getString(1));
        }
        long end = System.currentTimeMillis();
        System.out.println("selectStream span time="+(end-begin) + "ms");

        resultSet.close();
        statement.close();
        connection.close();
    }
运行,果然解决了OOM问题,无论数据量多大,都可以正常查询了。
在StatementImpl中有enableStreamingResults()方法,该方法其实就是设置这三个条件的,网上很多文章介绍此种方式开启流式查询,但笔者不太推荐这种方式,因为需要强制转换为MySQL驱动中的StatementImpl类,这其实已经并非JDBC的标准接口。
1
2
3
4
5
6
7
8
9
     public void enableStreamingResults() throws SQLException {
        synchronized (checkClosed().getConnectionMutex()) {
            this.originalResultSetType = this.resultSetType;
            this.originalFetchSize = this.fetchSize;

            setFetchSize(Integer.MIN_VALUE);
            setResultSetType(ResultSet.TYPE_FORWARD_ONLY);
        }
    }
至此,我们已经知道如何使用流式查询解决大数据查询时的OOM问题,但流式查询的实现原理我们还不清楚,因此我们继续看源代码一探究竟,为了更方便展示方法调用层次,我画了一个调用序列图:
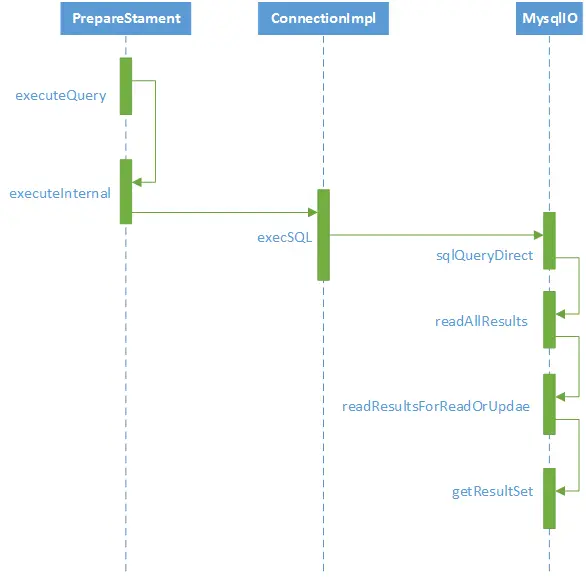
我们直接看com.mysql.jdbc.MysqlIO中的getResultSet方法:
1
代码略
三种查询方式
上代码可以看到,MySQL驱动会根据不同的参数设置选择对应的ResultSet实现类,分别对应三种查询方式:
- 1. RowDataStatic 静态结果集,默认的查询方式,普通查询
- 2. RowDataDynamic 动态结果集,流式查询
- 3. RowDataCursor 游标结果集,服务器端基于游标查询
简单看下这几个类的实现代码:
方式1 普通查询
1
2
3
4
5
6
7
8
9
10
11
12
13
14
15
16
17
18
19
20
21
22
23
24
25
26
27
28
29
30
31
 private RowData readSingleRowSet(long columnCount, int maxRows, int resultSetConcurrency, boolean isBinaryEncoded, Field[] fields) throws SQLException {
        RowData rowData;
        ArrayList<ResultSetRow> rows = new ArrayList<ResultSetRow>();

        boolean useBufferRowExplicit = useBufferRowExplicit(fields);

        // Now read the data
        ResultSetRow row = nextRow(fields, (int) columnCount, isBinaryEncoded, resultSetConcurrency, false, useBufferRowExplicit, false, null);

        int rowCount = 0;

        if (row != null) {
            rows.add(row);
            rowCount = 1;
        }

        while (row != null) {
            row = nextRow(fields, (int) columnCount, isBinaryEncoded, resultSetConcurrency, false, useBufferRowExplicit, false, null);

            if (row != null) {
                if ((maxRows == -1) || (rowCount < maxRows)) {
                    rows.add(row);
                    rowCount++;
                }
            }
        }

        rowData = new RowDataStatic(rows);

        return rowData;
    }
可以看出,此种方式其实就是一次性把查询的所有结果集都保存在本地数组中,所以如果数据量太大,超过jvm内存,则会报文中篇头所示的OOM错误。
方式2 流式查询
每次只获取一条结果集,待应用处理完再次调用next()时,继续获取下一条数据,由代码可以看出流式查询获取数据的方法与普通查询其实是一样的( this.io.nextRow),不同之处在与普通查询时先获取所有数据,然后交给应用处理(next方法其实都是从内存数组遍历),而流式查询时逐条获取,待应用处理完再去拿下一条数据。 com.mysql.jdbc.RowDataDynamic
1
2
3
4
5
6
7
8
9
10
11
12
13
14
15
16
17
18
19
20
21
22
23
24
25
26
27
28
29
30
31
32
33
34
35
36
37
38
39
40
41
42
43
44
45
private void nextRecord() throws SQLException {

        try {
            if (!this.noMoreRows) {
                this.nextRow = this.io.nextRow(this.metadata, this.columnCount, this.isBinaryEncoded, java.sql.ResultSet.CONCUR_READ_ONLY, true,
                        this.useBufferRowExplicit, true, null);

                if (this.nextRow == null) {
                    this.noMoreRows = true;
                    this.isAfterEnd = true;
                    this.moreResultsExisted = this.io.tackOnMoreStreamingResults(this.owner);

                    if (this.index == -1) {
                        this.wasEmpty = true;
                    }
                }
            } else {
                this.nextRow = null;
                this.isAfterEnd = true;
            }
        } catch (SQLException sqlEx) {
            if (sqlEx instanceof StreamingNotifiable) {
                ((StreamingNotifiable) sqlEx).setWasStreamingResults();
            }

            // There won't be any more rows
            this.noMoreRows = true;

            // don't wrap SQLExceptions
            throw sqlEx;
        } catch (Exception ex) {
            String exceptionType = ex.getClass().getName();
            String exceptionMessage = ex.getMessage();

            exceptionMessage += Messages.getString("RowDataDynamic.7");
            exceptionMessage += Util.stackTraceToString(ex);

            SQLException sqlEx = SQLError.createSQLException(
                    Messages.getString("RowDataDynamic.8") + exceptionType + Messages.getString("RowDataDynamic.9") + exceptionMessage,
                    SQLError.SQL_STATE_GENERAL_ERROR, this.exceptionInterceptor);
            sqlEx.initCause(ex);

            throw sqlEx;
        }
    }
方式3 RowDataCursor 基于游标
从代码我们惊喜的发现,MySQL其实是支持游标查询的,这种方式下MySQL服务器端一次只发送fetchSize条数据,MySQL驱动会获取完fetchSize条数据后返回给应用,应用处理完继续调用next()时,继续发送fetch命令,继续获取下一批次fetchSize条数据。
1
2
3
4
5
6
7
8
9
10
11
12
13
14
15
16
17
18
19
20
21
22
23
24
25
 protected List<ResultSetRow> fetchRowsViaCursor(List<ResultSetRow> fetchedRows, long statementId, Field[] columnTypes, int fetchSize,
            boolean useBufferRowExplicit) throws SQLException {

        if (fetchedRows == null) {
            fetchedRows = new ArrayList<ResultSetRow>(fetchSize);
        } else {
            fetchedRows.clear();
        }

        this.sharedSendPacket.clear();

        this.sharedSendPacket.writeByte((byte) MysqlDefs.COM_FETCH);
        this.sharedSendPacket.writeLong(statementId);
        this.sharedSendPacket.writeLong(fetchSize);

        sendCommand(MysqlDefs.COM_FETCH, null, this.sharedSendPacket, true, null, 0);

        ResultSetRow row = null;

        while ((row = nextRow(columnTypes, columnTypes.length, true, ResultSet.CONCUR_READ_ONLY, false, useBufferRowExplicit, false, null)) != null) {
            fetchedRows.add(row);
        }

        return fetchedRows;
    }
我们看下基于游标的查询测试代码:(设置useCursorFetch=true,指定fetchSize)
1
2
3
4
5
6
7
8
9
10
11
12
13
14
15
16
17
18
19
public static void selectStreamWithUseCursorFetch() throws SQLException{
        Connection connection = DriverManager.getConnection("jdbc:mysql://localhost:3306/test?useCursorFetch=true", "root", "123456");
        PreparedStatement statement = connection.prepareStatement("select * from test");
        statement.setFetchSize(10);

        long begin = System.currentTimeMillis();
        ResultSet resultSet = statement.executeQuery();


        while(resultSet.next()){
            //System.out.println(resultSet.getString(1));
        }

        long end = System.currentTimeMillis();
        System.out.println("selectStreamWithUseCursorFetch span time="+(end-begin) + "ms");
        resultSet.close();
        statement.close();
        connection.close();
    }
运行发现大数据量时这种方式也可正常运行。应用指定每次查询获取的条数fetchSize,MySQL服务器每次只查询指定条数的数据,因此单次查询相比与前面两种方式占用MySQL时间较短。但由于MySQL方不知道客户端什么时候将数据消费完,MySQL需要建立一个临时空间来存放每次查询出的数据,大数据量时MySQL服务器IOPS、磁盘占用都会飙升,而且需要与服务器进行更多次的网络通讯,因此最终查询效率是不如流式查询的。
本地测试查询100w数据,方式2与方式3执行时间对比:
selectStreamWithUseCursorFetch span time=507ms selectStream span time=155ms
从结果上看,由于基于游标方式,服务器端需要更多额外处理,查询性能更低些,对于大数据量一般情况下推荐基于动态结果集的流式查询。
总结:
本文通过对MySQL驱动中查询模块的源码进行剖析,可知MySQL支持三种不同的查询方式,分别适用不同的场景,了解其各自优缺点后,才能在实际项目中正确使用。 一、普通查询
- 优点:应用代码简单,数据量较小时操作速度快。
- 缺点:数据量大时会出现OOM问题。
二、流式查询
- 优点:大数据量时不会有OOM问题。
- 缺点:占用数据库时间更长,导致网络拥塞的可能性较大。
三、游标查询
- 优点:大数据量时不会有OOM问题,相比流式查询对数据库单次占用时间较短。
- 缺点:相比流式查询,对服务端资源消耗更大,响应时间更长。
sqljoin中on和where的区别
- on条件是在生成临时表时使用的条件,它不管on中的条件是否为真,都会返回左边表中的记录。
- where条件是在临时表生成好后,再对临时表进行过滤的条件。这时已经没有left join的含义(必须返回左边表的记录)了,条件不为真的就全部过滤掉。
group by后分组取最大值
有一个表
create table record
(
    id                      bigint                                   not null
        primary key,
    name					varchar									 not null comment '名称',
    paper_id                bigint                                   null comment '试卷id(随机抽题没有试卷)',
    update_time             datetime(6) default CURRENT_TIMESTAMP(6) not null comment '修改时间',
)
若只想查出id的最后修改时间,可以简单写出
select id, max(upadet_time) from record group by id
若想查出名称,就不能这样写了。这样的语句是非SQL标准的,虽然能够在MySQL数据库中执行成功,但返回的却是未知的 (如果sql_mode开启了only_full_group_by,则不会执行成功。) 可能ip字段会取uid分组前的第一个row的值,显然不是所需信息
写法1
select *
from yx_study_punch_activity_examination_record as a
where update_time in (
    select max(b.update_time)
    from yx_study_punch_activity_examination_record as b
    where a.paper_id = b.paper_id
    )
写法2
select *
from yx_study_punch_activity_examination_record as a
where update_time in (
    select max(b.update_time)
    from yx_study_punch_activity_examination_record as b
    group by b.paper_id
    )
顺便测了一下 在5.6以前的版本中,写法2这条sql在大数据量的情况下,执行计划不理想,目测性能不佳。 在5.6及以后的版本中,写法2这条sql会快很多,执行计划也有了改变
写法3
select *
from (select paper_id, max(update_time) update_time
      from yx_study_punch_activity_examination_record
      group by paper_id) b join yx_study_punch_activity_examination_record a
                                on a.paper_id = b.paper_id and a.update_time = b.update_time;
Cannot change the ExecutorType
但凡使用mybatis,同时与spring集成使用时,接下来要说的这个问题是躲不了的。众所周知,mybatis的SqlSessionFactory在获取一个SqlSession时使用默认Executor或必须要指定一个Executor,这样一来,在同一个SqlSession的生命周期中,要想切换Executor是不可能的,比如在一个复杂业务中:
1
2
3
4
sqlSession.insert("insertMainOrder", mainOrder); // -----(1)
for(OrderInfo childOrder : childOrderList){ // -----循环插入是可以的
sqlSession.insert("insertChildOrder", childOrder);
}
但是使用MyBatisBatchItemWriter是不行的,因为它使用了SqlSessionTemplate的batch属性,官方解释如下:
1
ItemWriter that uses the batching features from SqlSessionTemplate to execute a batch of statements for all itemsprovided.
以下是xml配置文件实现,也可以代码实现:
1
2
3
4
5
<!--结果写入库-->
<bean id="pickUpWriter" class="org.mybatis.spring.batch.MyBatisBatchItemWriter" scope="step">
    <property name="sqlSessionFactory" ref="sqlSessionFactory"/>
    <property name="statementId" value="com.cwenao.cc.basic.dao.NoticeInfoDao.insertSelective"/>
</bean>
如果sqlSession使用ExecutorType.SIMPLE open出来的话,(2)处如果是用Jdbc batch操作将是不可能的,当然(2)处如果你再新open一个ExecutorType.BATCH的新的SqlSession的话:A、如果整个业务在无事务环境下运行的话,则不会报错,但是底层会使用多个不同的Connection,浪费资源,最重要的是无法保持在同一个事务中。B、如果整个业务在一个事务中运行的话(如propagation=Propagation.REQUIRED),则会在mybatis-spring框架中报错:TransientDataAccessResourceException(“Cannot change the ExecutorType when there is an existing transaction”),也就是标题中的错误,究其原因是因为在mybatis-spring框架中在有事务情况下SqlSession是通过sessionFactory与当前线程绑定的,新open出来的SqlSession会与上一个使用的SqlSession的ExecutorType进行比较,如果ExecutorType改变了,则直接报错。
下面是stackoverflow的解释:
1
2
3
4
5
Because it sais it: you can't change the executor type inside the transaction.

it looks like you've tried to batch-write something as the part of more broad transaction that includes other SQL operations, but that transaction was started with SIMPLE (default) or REUSE executor type.

It's obvious, that batch-write requires BATCH executor type, though once the transaction started, it's executor type can not be changed. So, perform your batch operations in separate transaction, or run nested transaction, if your RDBMS allows it.
首先了解下相关知识,mybatis的执行器有三种类型:
- ExecutorType.SIMPLE
这个类型不做特殊的事情,它只为每个语句创建一个PreparedStatement。
- ExecutorType.REUSE
这种类型将重复使用PreparedStatements。
- ExecutorType.BATCH
这个类型批量更新,性能更优,但batch模式也有自己的问题,比如在Insert操作时,在事务没有提交之前,是没有办法获取到自增的id,这在某型情形下是不符合业务要求的,而且假如有一条sql语句报错,则整个事务回滚,虽然这条sql语句不是太重要。注意:在同一事务中batch模式和simple模式之间无法转换。
使用方式:
java代码中,创建模板的时候:
1
2
3
new SqlSessionTemplate(sqlSessionFactory, ExecutorType.BATCH);
或者
SqlSession session = getSqlSessionFactory().openSession(ExecutorType.BATCH);
xml文件配置:
1
2
3
4
<bean id="sqlSession" class="org.mybatis.spring.SqlSessionTemplate">
        <constructor-arg index="0" ref="sqlSessionFactory"/>
        <constructor-arg index="1" value="BATCH"/>
</bean>
下面是具体执行方法:
1,ExecutorType.SIMPLE:可以返回自增键,自增键会在事务提交后,自动设置到传入的user对象中,只需要在mapper文件中,增加属性: useGeneratedKeys=”true” keyProperty=”productId”,在外部java代码中添加循环语句,xml中就是单条数据插入:
1
2
3
4
5
6
7
8
9
10
11
12
13
14
15
    <!-- 插入一个user -->
    <insert id="insertUser" parameterType="User"
        statementType="PREPARED" useGeneratedKeys="true" keyProperty="userId">
        INSERT
        INTO user (
        <include refid="userColumns" />
        , create_time,
        update_time)
        VALUES
        (#{email}, #{pwd},#{nickname},
        #{phone}, #{sign}, #{age},
        #{birthday},
        #{createTime},
        now())
    </insert>
2,ExecutorType.SIMPLE,借助foreach动态sql语句,使用Insert values(…),(…),(…) 的方式,这种方式无法取到自增键,外部java代码中就不需要循环,在xml中使用循环,但是需要注意的是,该SQL语句不能在实现ItemWriter接口的类中调用,不然会报异常:Cannot change the ExecutorType when there is an existing transaction:
1
2
3
4
5
6
7
8
9
10
11
12
13
14
15
16
17
18
19
20
21
    <!-- 批量插入user -->
    <insert id="insertUsers" parameterType="map" useGeneratedKeys="true"
        keyProperty="userId">
        INSERT
        INTO user (
        <include refid="userColumns" />
        , create_time,
        update_time)
        VALUES
        <foreach collection="users" item="userCommand" index="index"
            separator=",">
            (#{userCommand.email},
            #{userCommand.pwd},#{userCommand.nickname},
            #{userCommand.phone},
            #{userCommand.sign}, #{userCommand.age},
            #{userCommand.birthday},
            #{userCommand.sex},
            #{userCommand.createTime},
            now())
        </foreach>
    </insert>
或者这样写在代码中,不需要xml配置文件:
1
2
3
4
5
6
7
8
9
10
11
12
13
14
15
16
17
18
19
20
21
@Component("ledgerWriter")
public class LedgerWriter implements ItemWriter<Ledger> {

    @Resource
    private NamedParameterJdbcTemplate jdbcTemplate;
    private static final String sql = "insert into tableA(a,b) values (:col1,:col2)";
    /**
     * 写入数据
     *
     * @param ledgers
     */
    public void write(List<? extends Ledger> ledgers) throws Exception {
        //将userDtoList转化成BeanPropertySqlParameterSource[]数组
        List<BeanPropertySqlParameterSource> userSourceList = new ArrayList<BeanPropertySqlParameterSource>();
         for (UserDto userDto : userDtoList) {
           userSourceList.add(new BeanPropertySqlParameterSource(userDto));
         }
         BeanPropertySqlParameterSource[] beanSources  =  userSourceList.toArray(new BeanPropertySqlParameterSource[userSourceList.size()]);
         jdbcTemplate.batchUpdate(sql, beanSources);
    }
}
3,ExecutorType.BATCH,但是SqlSession的执行器类型一旦设置就无法动态修改,因为这个方法仍然需要包在事务中。所以如果在配置文件中设置了执行器为SIMPLE,当要使用BATCH执行器时,需要临时获取,只能在单独的事务中进行:
1
2
3
4
5
6
7
8
9
10
11
12
13
14
15
16
17
18
 SqlSession session = sqlSessionTemplate.getSqlSessionFactory()
                .openSession(ExecutorType.BATCH, false);
        try {
            UserDao batchUserDao = session.getMapper(UserDao.class);

            for (UserCommand user : users) {
                batchUserDao.insertUser(user);
            }
            session.commit();
            // 清理缓存,防止溢出
            session.clearCache();

            // 添加位置信息
            userLbsDao.insertUserLbses(users);

        } finally {
            session.close();
        }
4,ExecutorType.BATCH,全部改成batch模式。但是没有办法获取到自增的id,spring事务一起使用,将无法回滚,必须注意,最好单独使用。需要用到一个类:MyBatisBatchItemWriter,它是批量执行更新操作。